If you’ve ever pulled your boat out of the water and found a crusty layer stuck to the bottom, you’re definitely not alone. Barnacles attach fast, grow stubborn, and turn into a headache if you wait too long. The real challenge is figuring out barnacle removal without damaging your hull. Do it right, and your boat glides through the water easier, uses less fuel, and avoids long-term wear. Do it wrong, and you end up scratching gelcoat, stripping paint, or weakening your hull’s protective layers.
Here’s the thing: barnacles aren’t just cosmetic pests. Their base plates bond like concrete, and aggressive scraping can gouge into fiberglass or aluminum. The goal is a clean hull without scars. So let’s break down how to remove barnacles safely, what tools actually work, when to clean, and how to stop them from returning.
Why Barnacle Removal Without Damaging Your Hull Matters
When barnacles attach, they bring two problems. First, they create drag that slows you down and burns fuel. Second, their anchor plates cling hard enough to pull away gelcoat if you pry them incorrectly. Some boat owners think brute force solves everything, but rushed scraping often leads to scratches that cost more to repair than the cleaning itself. A careful approach protects the hull and makes maintenance predictable instead of stressful.
Safe barnacle removal also plays into long-term hull health. Consistent, gentle cleaning protects your anti-fouling paint and reduces how often you need full recoats. This saves money and extends the life of the hull’s protective systems.
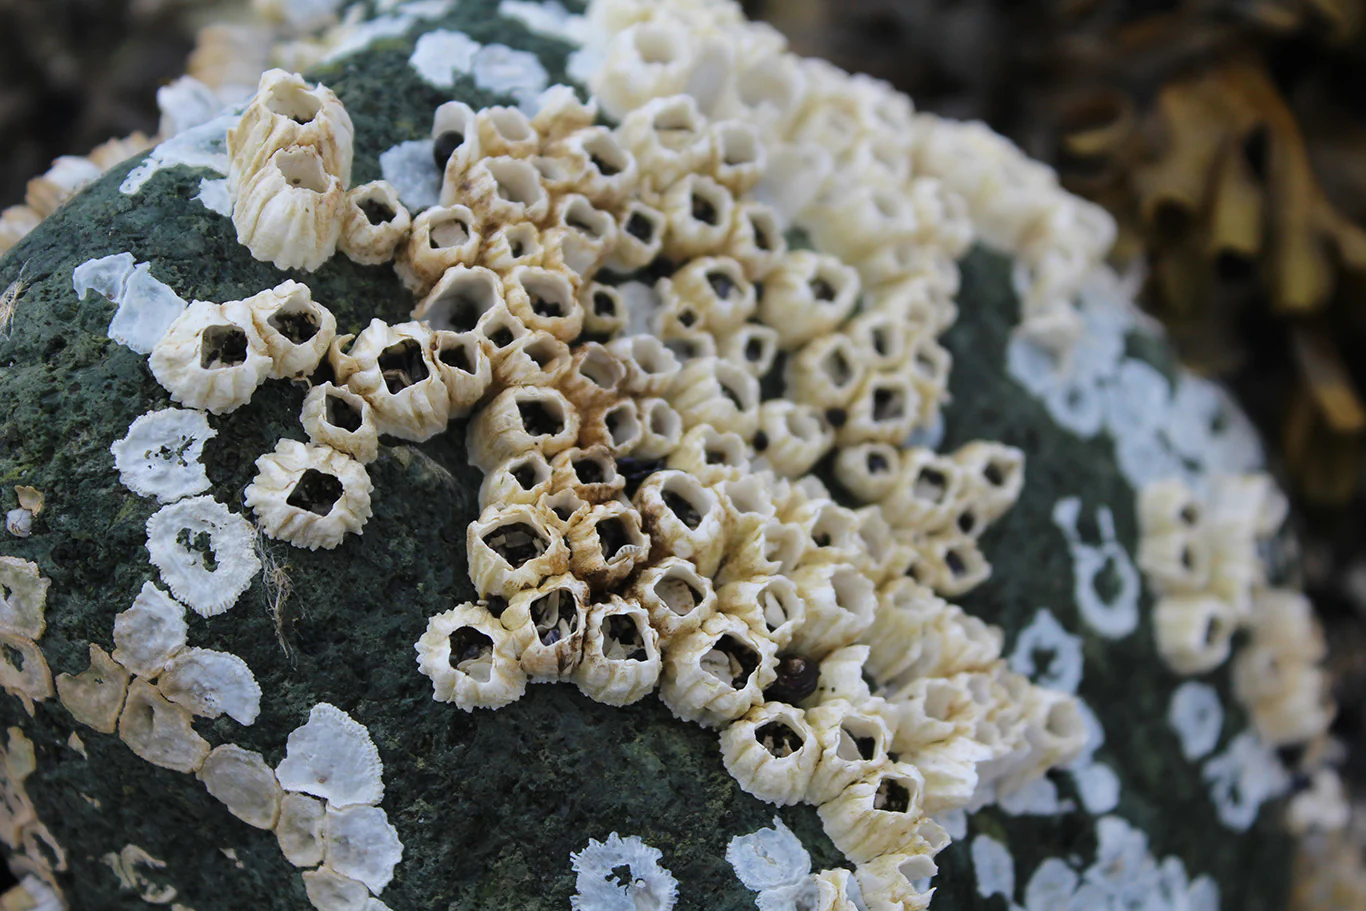
The Science Behind Barnacle Attachment
Barnacles glue themselves to surfaces using a natural protein adhesive that hardens underwater. This glue attaches so firmly that dry scraping alone rarely gets underneath it cleanly. Once the barnacle dies or dries, its base becomes brittle, which is both good and bad. Good because it breaks easier. Bad because it can chip away gelcoat if you force it.
Understanding this helps choose the right technique. Your goal is to weaken or loosen the bond before scraping, not muscle through it.
Tools You Need for Safe Barnacle Removal
You don’t need a mountain of equipment, just the right mix of controlled tools that won’t gouge into the hull. Keep everything within reach before starting.
- Plastic or nylon scraper (primary tool)
- Soft-bristle hull brush
- Bucket of warm water or a hose
- Marine-safe barnacle dissolver or lifting agent
- Microfiber cloths
- Protective gloves
- Boat stand or lift for safe access
Skip metal scrapers unless you’re cleaning a metal hull and know exactly what you’re doing. Even then, use them sparingly. Plastic edges provide enough leverage for barnacles once they’re softened or partially lifted.
Preparing Your Hull Before Barnacle Removal
Some boat owners start scraping immediately, but a little prep makes everything easier. Think of it like loosening bolts before removing them.
Start by rinsing the hull thoroughly. Warm water helps soften leftover organic material. You don’t need boiling water; just enough warmth to make the barnacle tissue a bit more pliable. If you’re using a marine-safe dissolver, apply the product now and give it the recommended dwell time.
The goal is to let moisture and chemistry do the hard work before you ever touch a scraper.
Step-by-Step: Barnacle Removal Without Damaging Your Hull
1. Moisten and Loosen the Barnacles
Begin by thoroughly wetting the hull. Barnacles release more cleanly when hydrated. Use a hose or apply warm water with a sponge. If you’re working on a dry-docked boat, rewet sections as you go.
If you’re using a dissolver, spray or brush it on now. Let it rest, because the active ingredients weaken the organic base and soften the adhesion ring.
2. Start With a Plastic Scraper
Use slow, controlled motion with a firm plastic scraper. Slide the tool underneath the outer edge of the barnacle and lift with consistent pressure. The key is not prying at sharp angles. Shallow entry angles help the barnacle pop without catching the gelcoat.
Some barnacles will leave a wafer-thin calcium plate behind. Don’t grind it. We’ll handle that safely in the next step.
3. Remove Base Plates Carefully
If you rush this part, that’s when gelcoat damage happens. Spray warm water again or refresh the dissolver. Then, use a nylon brush to scrub gently. Small circular motions work best. Most base plates crumble with enough moisture and a bit of friction.
If a plate refuses to budge, repeat the softening step rather than attacking it. Patience beats repair bills.
4. Clean the Area With a Soft Brush
After the barnacles and plates are gone, use a soft-bristle brush to remove residue. This exposes any remaining bumps without risking scratches. If you notice tough calcium patches, soften them again and re-brush instead of scraping harder.
5. Rinse and Inspect the Hull
Give the hull a full rinse. Look for any raised spots or stubborn edges. At this point, most areas should feel smooth. If you find leftover fragments, repeat the earlier steps lightly. Avoid the temptation to chip them away aggressively.
6. Finish With a Gentle Wipe-Down
Use microfiber cloths to dry the surface and check the hull closely. Smoothness matters because any leftover barnacle material becomes a prime attachment point for the next wave. You’re aiming for a hull that feels consistent from bow to stern.
Safe Barnacle Removal for Different Hull Types
Fiberglass Hulls
Fiberglass requires the most caution. Gelcoat scratches easily, and barnacle bases can tear right through if scraped while dry. Always rehydrate and soften first. Avoid sharp edges entirely.
Aluminum Hulls
Metal hulls tolerate firmer scraping, but corrosion risks increase if you gouge the protective coating. Stick with plastic scrapers unless you’re trained in metal hull work.
Painted or Anti-Fouling Coated Hulls
Your goal here is to remove barnacles without lifting protective paint. Take your time during the scrubbing stage and keep everything lubricated with water to prevent abrasion.
How Often You Should Remove Barnacles
The ideal schedule depends on your waters. Warm, nutrient-rich environments grow barnacles fast. Cold water slows them down, but they still develop. As a rule of thumb:
- Warm coastal waters: inspect every 3–6 weeks
- Temperate waters: inspect every 6–10 weeks
- Cold waters: inspect every 8–12 weeks
If your boat sits idle most of the season, barnacle growth accelerates, so don’t skip inspections.
Preventing Future Barnacle Growth
Once you’ve gone through the work of barnacle removal without damaging your hull, prevention becomes a lot more appealing. Here are simple ways to reduce future growth.
- Keep anti-fouling paint fresh and intact.
- Use regular freshwater rinses after outings, if possible.
- Store the boat on a lift or trailer when you can.
- Inspect hull monthly during peak seasons.
- Consider environmentally friendly deterrent coatings.
You can also check reputable marine resources for anti-fouling research. For example: BoatUS maintenance guides and NOAA marine growth information.
When It’s Better to Hire a Professional
Most boaters can handle routine barnacle removal, but if you notice deep attachment, damaged paint, or a large growth field, a pro might be worth it. Professionals use controlled water pressure, diving techniques, and materials that reduce long-term stress on your hull.
If you’ve never cleaned a barnacle-heavy hull before, getting help once can teach you what “safe” actually looks like in practice.
Maintaining a Clean Hull Year-Round
Once you get the hang of barnacle removal without damaging your hull, maintenance becomes a quick routine instead of a dreaded task. The key is timing. Barnacles get tougher as they age, and early intervention saves both effort and hull protection.
Think of hull care as an ongoing habit. The more consistent you are, the easier each cleaning becomes.
FAQs
How do I remove barnacles without scratching gelcoat?
Keep the hull wet, soften the base, use plastic scrapers, and avoid sharp angles. Slow, shallow lifts protect the gelcoat.
Can I pressure wash barnacles off my boat?
Light pressure works, but high-pressure blasting can strip paint or etch the hull. Soften the barnacles first before any spraying.
How often should I check my hull for barnacles?
Every 4–8 weeks depending on your waters. Warmer areas require more frequent checks.
